Eujgoov B098NFD49C Thermal Imager: Unveiling Hidden Heat Signatures
Update on April 14, 2025, 6:27 a.m.
Have you ever walked past a window on a cold day and felt a distinct chill, even though it was closed tight? Or perhaps noticed your phone charger feeling unusually warm to the touch? These are common experiences, hints of an invisible world operating just beyond our normal senses – the world of heat and temperature differences. We feel extreme heat and cold, but much of the thermal landscape around us, full of subtle variations and hidden clues, remains unseen. What if you could peel back that veil? What if you could actually see heat? This isn’t science fiction; it’s the reality made possible by thermal imaging technology. And tools like the Eujgoov Infrared Imaging Camera (ASIN: B098NFD49C) are designed to offer a first glimpse into this fascinating realm.

The Science of Seeing Heat: How Thermal Imaging Works
To understand how a thermal camera works, we first need to talk about something fundamental: infrared (IR) radiation. Think of the light we see – it’s part of a vast spectrum of electromagnetic waves. Infrared radiation is simply another part of that same spectrum, but with wavelengths longer than visible red light, making it invisible to our eyes. Here’s the key: everything around us with a temperature above absolute zero (which is practically everything) is constantly emitting this invisible infrared energy. It’s like every object is its own tiny, invisible heat lamp.
Crucially, the amount and wavelength of IR radiation an object emits are directly related to its temperature. Hotter objects emit more intense infrared radiation, appearing “brighter” in the infrared spectrum, much like a hotter stove element glows brighter in visible light. Colder objects emit less. This fundamental principle of physics (related to concepts like blackbody radiation, though we don’t need the complex math here - General Science Knowledge) is what thermal cameras leverage.
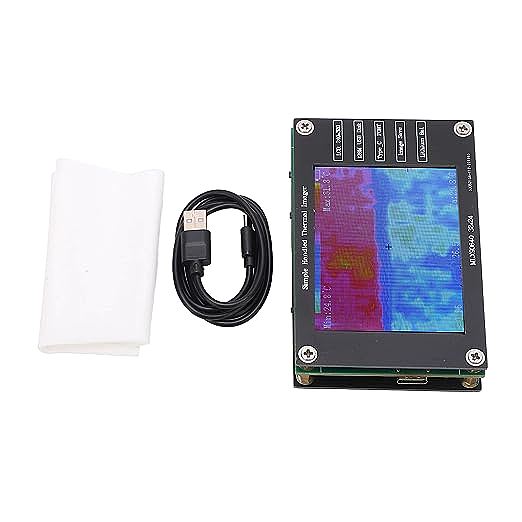
A thermal imaging camera, like the Eujgoov model, essentially acts as an “eye” for this infrared light. Inside, it houses a special sensor, a grid of tiny detectors often called a microbolometer array. The Eujgoov camera is specified to have a sensor resolution of 24x32 dots – imagine a tiny grid with 24 rows and 32 columns, totaling 768 individual heat-sensing points. Each of these points measures the intensity of the infrared radiation hitting it from a specific spot in the scene the camera is pointed at (its field of view is given as a default 35x55 degrees for the specific sensor probe mentioned, the MLX90640ESF-BAB).
The camera’s internal processor takes the readings from all these sensor points and does something remarkable: it translates those invisible heat intensities into a visible image on its screen. This isn’t a photograph like your phone takes; it’s a thermogram, or heat map. To make sense of the temperature differences, the camera assigns different colors to different temperature ranges – this is often called a pseudo-color palette. Typically, blues and purples might represent cooler areas, while oranges, reds, and yellows indicate warmer or hotter spots. The Eujgoov camera features an adjustable screen color function, allowing you to customize how temperatures correspond to colors, which can help highlight areas of interest depending on what you’re looking for.
Now, here’s a fascinating and critical detail: emissivity. Different materials, even when at the exact same temperature, don’t emit infrared energy equally well. Think about wearing a matte black shirt versus a shiny silver jacket on a sunny day – the black shirt absorbs (and later emits) heat much more effectively. Similarly, a dull, dark surface is a much better emitter of IR radiation than a shiny, reflective one. This property is quantified by a value called emissivity, ranging from 0 (perfect reflector, no emission) to 1 (perfect emitter, a theoretical “blackbody”). Most real-world objects fall somewhere in between.
Why does this matter? Because a thermal camera measures the radiation it receives, not the temperature directly. To estimate the actual temperature accurately, the camera needs to know the emissivity of the surface it’s looking at. A shiny metal surface (low emissivity) might be very hot but emit little radiation, potentially tricking the camera into thinking it’s cooler than it is. Conversely, a dull, dark surface (high emissivity) at the same temperature will appear much “brighter” to the IR sensor. The Eujgoov thermal imager includes a vital feature for even basic use: an adjustable emissivity setting, ranging from 0.01 to 1.00. By setting this value to better match the material you’re observing (you can often find reference tables online for common materials - General Science Knowledge), you can significantly improve the relative accuracy of your temperature readings. Getting absolute temperature spot-on requires careful calibration and control, but adjusting emissivity is crucial for making meaningful comparisons between different points or materials in the same scene.

Meeting the Eujgoov B098NFD49C: An Entry-Level Explorer
Described by its seller as originating from a desire to make well-liked products accessible, the Eujgoov Infrared Imaging Camera (ASIN: B098NFD49C) appears positioned as exactly that: an accessible entry point for those curious about the thermal world. It’s designed to be pocket-sized (the listed weight is around 4.87 ounces, though the source’s listed dimensions of 0.39x0.39x0.39 inches are clearly placeholder data and physically impossible, so actual size perception should rely on product images not available here) and features a built-in 1000 mAh lithium battery, conveniently rechargeable via a standard Micro USB port (important: the source notes the interface voltage should not exceed 5V).
Its 2.4-inch LCD screen (with a 320x240 resolution for displaying the menus and thermal image) shows the generated heat map and highlights key temperature points: the highest temperature detected in the scene, the lowest, and the temperature at the center aiming point. It can also display the temperature data for each coordinate point captured by the sensor array.
Now, let’s talk honestly about the heart of this imager: the 24x32 sensor resolution. This is, by modern thermal imaging standards, very low. What does this mean practically? Imagine looking at an image made of only 768 large, square pixels. The resulting thermal image will appear very blocky, almost like looking at early computer graphics or a mosaic artwork made of large tiles. You won’t see fine details or smooth temperature gradients. Think less of a high-definition photograph and more of a coarse map showing general areas of ‘hotter’ and ‘cooler’.
Is this useful? Absolutely, depending on your goal. This resolution is generally sufficient for spotting significant temperature differences over larger areas: a cold draft streaming in from a window frame, a noticeably overheating power brick, a section of wall that’s clearly colder than its surroundings. However, it will likely struggle to distinguish small components on a circuit board that are only slightly warmer than their neighbors, or pinpoint very subtle variations in insulation. Understanding this core limitation is key to having realistic expectations.
The camera offers a wide temperature measurement range, from -40°C up to +300°C (-40°F to 572°F). This covers many common diagnostic tasks, from checking freezer temperatures to looking at automotive components or cooking surfaces. The specified measurement accuracy is ±2°C (or ±3.6°F). It’s crucial to note the context provided: this accuracy was determined under specific lab conditions (an ambient temperature of 25°C measuring boiling water at 100°C). In real-world scenarios, factors like the accuracy of your emissivity setting, the distance to the target, atmospheric conditions (like humidity), and reflections can all influence the absolute accuracy. For an entry-level tool like this, it’s often more valuable to focus on relative temperature differences within the scene rather than expecting precise absolute temperature measurements. Is this spot hotter than that spot? That’s a question this camera can likely help answer.
Other features cater to beginner use. A screenshot function allows you to freeze the image on screen for closer examination or documentation. The USB data transmission interface is an interesting addition; the source states the firmware automatically outputs data to the USB port. This allows connection to computer software (at a specified baud rate of 115200) for potentially viewing the image on a larger screen or using it with serial debugging tools, offering some basic expansion capability. The specified 8Hz “response frequency” (likely referring to the image refresh rate) is relatively slow. This means the image updates 8 times per second. It’s generally adequate for observing static or slowly changing temperatures, but you might notice blurring or lagging if you pan the camera quickly or try to observe fast-moving hot or cold objects.
Your First Thermal Adventure: What Can You Discover?
Armed with even a basic thermal imager like the Eujgoov, you can start exploring the hidden thermal landscape around you. What might your first discoveries be?
- The Draft Detectives: Scan around windows, doors, and electrical outlets on a cold day. Those blocky, cool-colored (blue/purple) patches or streaks contrasting against a warmer wall are likely air leaks stealing your expensive heat.
- Hot Spots in Electronics: Point it at your collection of chargers, power adapters, or even your computer while it’s running. Are any showing significantly brighter, hotter colors (yellow/red) than others? This could indicate inefficiency or a potential issue.
- Plumbing Puzzles: Check hot water pipes – you should clearly see their path as warm lines. Look for unexpected cool spots on ceilings below bathrooms, which might (cautiously) indicate a slow water leak causing evaporative cooling.
- Basic HVAC Checks: See if warm or cool air is actually coming out of vents, and compare the temperature distribution across different rooms.
- Beyond the Home: The suggested uses include looking at PCB components (though distinguishing tiny parts will be hard), checking auto parts for unusual heat (like a sticking brake caliper, perhaps), or identifying warm electrical switches or connections (use extreme caution and proper safety knowledge/gear when dealing with electricity!).
Interpreting the blocky 24x32 image takes a little practice. Don’t expect sharp outlines. Instead, look for distinct areas of contrasting color. Is there a sudden shift from blue to yellow? Is there an unexpected blob of red where everything else is green or blue? Focus on these anomalies and patterns. Because the resolution is low, you might need to get closer to smaller targets to ensure they fill enough pixels to register clearly.
Safety First: Remember, a thermal imager sees heat, but it doesn’t see through walls or guarantee safety. When investigating electrical systems, always assume circuits are live unless verified otherwise by proper testing procedures. Use appropriate personal protective equipment and follow all safety guidelines.
Understanding the Limits, Embracing the Possibility
It’s important to be clear about what this Eujgoov thermal imager, representative of entry-level tools, cannot do well. Primarily due to its 24x32 resolution, it won’t provide detailed thermal analysis. You won’t be able to pinpoint tiny overheating resistors on a complex circuit board, identify subtle insulation variations across a large wall section, or reliably measure the temperature of very small objects from a distance. Furthermore, the source material doesn’t specify the thermal sensitivity (NETD), which measures the smallest temperature difference the camera can detect, another crucial parameter for advanced analysis.
However, dwelling solely on limitations misses the point. The true value of even a basic thermal imager lies in the fundamental shift in perspective it offers. It takes the invisible world of heat and makes it visible, transforming guesswork into direct observation. Instead of just feeling a draft, you can see where it’s coming from. Instead of just suspecting an appliance is running hot, you can visualize its heat signature. This ability to see temperature patterns provides a powerful new layer of information for troubleshooting, exploration, and simply understanding the environment around us.
The source product page mentions a 3.5 out of 5-star rating based on only 4 global ratings. It is essential to understand that such a small sample size provides virtually no statistically reliable insight into overall customer satisfaction. It merely suggests, perhaps unsurprisingly for an entry-level technical tool with significant limitations, that the few users who rated it had varied experiences.

Conclusion: Your First Step into the Infrared
The Eujgoov Infrared Imaging Camera (ASIN: B098NFD49C), based on the provided information, presents itself as a rudimentary and likely affordable gateway into the world of thermal imaging. With its pocket-sized form factor, USB charging, adjustable emissivity, and basic thermal visualization capabilities, it offers the core function: making unseen heat patterns visible.
Its primary limitation is undoubtedly the very low 24x32 sensor resolution, which restricts its use to identifying relatively large or distinct temperature differences. It’s not a professional diagnostic instrument for subtle analysis. But perhaps its greatest strength lies in its potential accessibility, offering curious homeowners, DIY enthusiasts, hobbyists, and students a chance to take their first exploratory steps into the fascinating infrared spectrum. If you approach it with realistic expectations, understanding its capabilities and constraints, the Eujgoov imager could be the key that unlocks a whole new way of seeing and understanding the thermal dynamics shaping the world around you.